You can give your guests immediate and complete access to the internet via your guest WiFi network. You can also direct them to a captive portal that asks them to fill up a form, view an ad, or accept your agreement terms. The latter has become a standard operating practice for most businesses. A UniFi captive portal is a popular option among business owners, managers, and digital marketers. How do you set up a captive portal for UniFi? How does it benefit your business?
How a Captive Portal Works
A UniFi guest captive portal only refers to a captive portal that uses UniFi, which is part of Ubiquiti’s vast array of state-of-the-art IT solutions. A captive portal refers to the web page that newly connected guest WiFi users see before they are granted broader access to the internet.
Establishments with an open wireless network, or guest WiFi, commonly use captive portals for communication and marketing purposes. When a guest tries to connect to a guest WiFi, the captive portal may show them a welcome message, a registration form, terms of use, a prompt to join via a social media account, or an ad. Users must complete a particular “task,” such as accepting the terms and conditions, on the captive portal before they can freely access the network.
What’s the Purpose of a Captive Portal?
If you have a WiFi hotspot for your business, you can use a captive portal for any of the following:
- Collect additional customer information that you can later use for targeted marketing.
- Limit the time or bandwidth use of guests who connect to your WiFi.
- Use guest WiFi analytics to understand guest behaviors.
- Promote your products/services via ads.
- Connect with guests via your social media pages.
- Prompt customers to leave feedback or sign up for email newsletters.
- Generate revenue by charging guest users a fee to access the network.
Unifi Captive Portal Setup: A Step-by-Step Guide
Ubiquiti’s UniFi solution is an excellent option for businesses that need advanced guest WiFi management tools. Here’s a step-by-step guide if you need help with your UniFi captive portal setup.
1. Create a Guest WiFi Network
First things first, you need to create your UniFi guest WiFi network.
- Open UniFi Network and go to Settings > WiFi.
- Select Add New Guest Hotspot.
- Provide a name for your guest WiFi hotspot, which users will see on their device’s WiFi network list when attempting to connect.
- Select the existing network to add the guest hotspot.
- Select the authentication methods you want for guests who attempt to access the hotspot.
- Enable the Guest Portal. Doing so will open additional options in the Portal Design dropdown section. Note that the UniFi Network app must be running at all times for the Guest Portal to function. Guests are redirected to the application to reach the guest portal, and the redirection will not be successful if the application is not accessible.
2. UniFi Captive Portal Setup
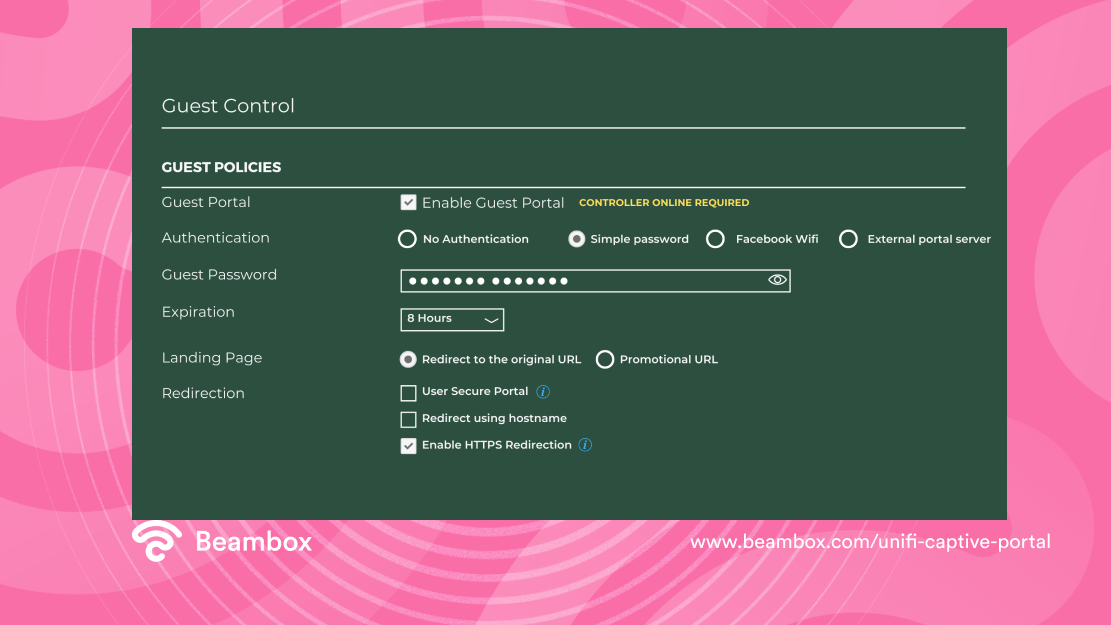
To finish creating and configuring your guest WiFi network, let’s take care of your UniFi captive portal setup. After selecting Enable Guest Portal, here are your options for configuring your Guest Portal:
- Authentication. Choose whether you require No authentication, a Simple password, Hotspot, Facebook WiFi, or an External portal server. If you select Simple password, input the Guest Password.
- Expiration. Set a time limit for guest network access.
- Landing Page. Select Redirect to the original URL if you want to give your guests immediate access to the internet. Select the Promotional URL to redirect to your website or a promotional ad first.
- Redirection. Enable HTTPS Redirection to redirect your guests to a Promotional URL.
Once you’re done configuring your UniFi Guest Portal, you can configure additional settings in the Advanced section. And then click Apply Changes to finish creating your UniFi guest WiFi network.
3. UniFi Captive Portal Customization
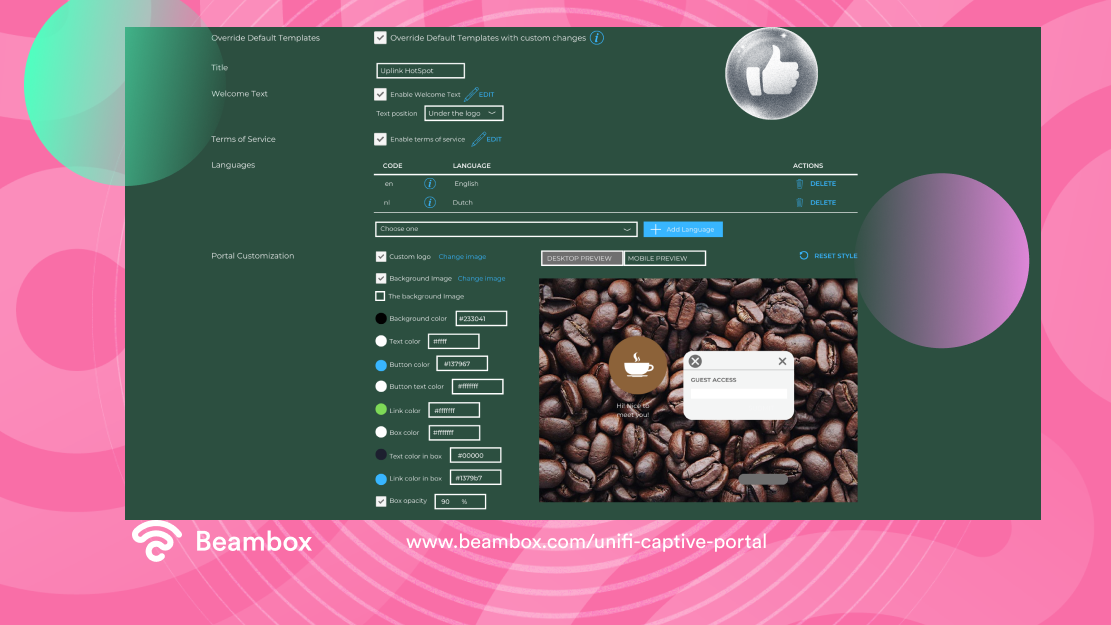
UniFi captive portal customization allows you to add corporate branding to your captive portal and enable other captive portal features. Here are your options for UniFi captive portal customization.
- Enable welcome text
- Enable Terms of Service
- Add language options for foreign guests.
- Add a custom logo
- Add a background image
You can use the welcome text feature to inform customers of their time limit for network access or to present them with a coupon code. When adding a background image, make sure it blends well with your logo. The ideal image size is at least 1280px by 720 px. UniFi recommends an image size of 920px by 640px. Note that your image is displayed with a border on some screens.
4. UniFi Captive Portal Template
Here’s a UniFi captive portal template image to give you an idea of how to customize your UniFi captive portal.
You can customize your UniFi captive portal to present a guest WiFi user with your terms of service, which they must agree to access your hotspot. After setting a password for your WiFi hotspot, you can print it out on receipts to restrict WiFi access to paying customers. You can also configure your captive portal to limit bandwidth use per device/guest or how long each user can stay connected.
From a marketing perspective, your captive portal presents an excellent opportunity for seamless and more targeted customer engagement. Configure your captive portal to redirect guests to a landing page. Guests are prompted to complete a survey, view an ad, or take advantage of an exclusive promo.
Captive Portal Management With UniFi Controller
The UniFi Controller is a wireless network management software suite that allows you to set up, configure, manage, and analyze multiple wireless networks using your browser. You can install the UniFi Controller software when creating a UniFi network.
Download the UniFi Controller software from the Ubiquiti Networks website, downloads.ubnt.com/UniFi. Mac users should download UniFi.pkg, and Windows users should download UniFi-installer.exe. Follow the instructions for your computer type.
External Captive Portal for UniFi
You can also set up an external captive portal for your UniFi network using Beambox. Beambox seamlessly connects to your existing UniFi controller so you can provide an enhanced guest WiFi experience via a more powerful UniFi captive portal.
Using Beambox’s all-in-one WiFi marketing solution will still allow you to configure and manage your UniFi networks through your controller. Beambox is compatible and can integrate with all UniFi controller versions. This allows you can configure your guest portal features through our cloud. Integrate your UniFi with Beambox’s advanced WiFi marketing tools to improve the guest experience, better understand your customers, increase your online reviews, and grow with smart marketing.
Unifi Captive Portal Not Loading and Other Issues
The most common issue users encounter is their UniFi captive portal not loading. If you’re not using an external captive portal, the best solution is to visit the Ubiquiti community page specifically, the community page for captive portal problems and solutions. The community page is where you can engage with other users of Ubiquiti products regarding all sorts of topics. You can ask a question, browse the available topics, and join a discussion.
After leveling up your UniFi network with Beambox integration and configuring your UniFi captive portal, here are some possible solutions to common guest network issues:
- It takes a long time for guests to be given internet access. Remove your wireless network and re-create it in its simplest form. Don’t add any additional configurations or VLAN associations. Then, test the network and incrementally add back configurations to find what is slowing it down.
- Guests receive an error page when connecting to the network. Errors happen when Beambox loses connection to your controller for more than 5 minutes. To fix this, watch this video. Make sure your controller stays online and available to prevent this from happening again.
- The WiFi login shows on some devices but not all of them. Check if your network name is the same as before you integrated with Beambox. If yes, adjust your network name slightly to get devices to accept the new WiFi login.
Connect, capture, and keep more customers with Beambox. You can opt for the Beambox Plug & Play to connect to your existing router. You can also add Beambox to your existing network via cloud integration, such as UniFi, Omada, Meraki, and more. Accelerate your business growth — start your Beambox free trial today!
Get Started With Free WiFi Marketing
Beambox helps businesses like yours grow with data capture, marketing automation and reputation management.
Sign up for 30 days free
